How to Improve Food Photo Lighting: From Phone Shots to Menu-Ready Images
Great menu photos do not require expensive equipment or professional photographers. Learn what actually matters for food photo lighting, practical food photo editing tips, and how AI scene transformation turns your phone photos into professional images.
In This Article
- Why Food Photos Matter More Than Ever
- The Two Things That Make Great Menu Photos
- Food Photo Lighting: What Actually Matters
- Food Photo Editing Tips That Work
- Why Scene Transformation Beats Traditional Photography
- FAQ
Why Food Photos Matter More Than Ever
On delivery apps - whether Talabat, Deliveroo, Uber Eats, or Swiggy - your food photo is often the only thing standing between an order and a scroll-past. Customers can't smell your dishes or see your restaurant's atmosphere. They decide based on what's on screen.
The numbers back this up. Menu items with professional photos see up to 30% higher sales.[1] Nearly half of customers decide what to order within 5-10 minutes of opening an app.
 Good lighting and intentional composition provide the foundation. AI transforms the setting.
With the global food delivery market exceeding $288 billion and projected to pass $500 billion by 2030, the competition for attention is fierce. Your phone photo competes against restaurants with professional photography budgets.
But here's what most guides will not tell you: you do not need a professional photographer or studio equipment to compete. You need to understand what actually makes food photos work.
The Two Things That Make Great Menu Photos
Every successful food photo comes down to two components:
1. Input quality - the photo you capture (lighting, sharpness, food presentation)
2. Scene and setting - the environment surrounding your food (background, surfaces, atmosphere)
Traditional food photography requires getting both right in a single expensive photoshoot. A photographer sets up lighting, arranges the scene, and captures 10-15 dishes over several hours. You get one style, one setting, and if your menu changes - you schedule another shoot.
With AI scene transformation, you can split these two things. You handle the input quality with your phone. The AI handles the scene and setting, letting you try multiple styles, iterate until you're happy, and keep your entire menu consistent.
This means understanding food photo lighting is not about creating perfect studio conditions. It is about capturing photos that transform well.
Food Photo Lighting: What Actually Matters
You do not need perfect lighting. You need good enough lighting that preserves detail and colour for transformation.
The Minimum Requirements
Adequate brightness. Your camera needs enough light to capture sharp detail. A photo taken in a dim room will be noisy, lose texture, and limit what any editing or AI can do with it. You do not need studio lights - a well-lit kitchen or table near a window works fine.
Reasonable colour. Restaurant tungsten bulbs (the warm, cosy ones) cast an orange tint that cameras exaggerate. Your eyes compensate automatically; cameras do not.[2] This is not a dealbreaker, but be aware that extreme colour casts affect your results.
Sharp focus. This is non-negotiable. A blurry photo stays blurry no matter what you do with it. Hold your phone steady, tap to focus on the food, and keep reasonable distance (about 60cm works well for most dishes).
The Easiest Way to Improve Food Photo Lighting
Natural window light (indirect, not direct sunlight) produces better food photos than most artificial setups.[3] Position your dish near a window with the light coming from the side or behind. Morning light tends to be softer and more forgiving.[4]
No windows available? Look for evenly-lit areas away from harsh spotlights. The goal is avoiding deep shadows that hide texture and extreme highlights that blow out detail.
What to Avoid
Flash. Phone flash creates flat, harsh light from directly in front, the worst possible angle for food. It eliminates the shadows that give dishes dimension.[5] If your scene is too dark for a decent photo, find better light rather than adding worse light.
Mixed light sources. Daylight from a window mixed with warm interior bulbs creates colour problems that are difficult to fix. Half your image looks orange, half looks blue.[6] Stick to one light source when possible.
Total darkness. AI generates stunning backgrounds and scenes, but it needs to see your food clearly to preserve it accurately. A dark, underexposed photo means the AI cannot distinguish your food's colours, textures, and details, and the results will reflect that.
Shooting Angles That Work
The angle matters as much as lighting:
| Angle | Best For | Why |
|---|---|---|
| 45-degree | Most dishes | Mimics how we naturally see food at the table |
| Overhead (90°) | Flat dishes (pizza, bowls, salads) | Shows patterns and arrangement |
| Straight-on (0°) | Tall foods (burgers, layer cakes) | Emphasizes height and layers |
The 45-degree angle is most versatile and helps avoid shadow problems from overhead lights.[7]
Tip for scene transformation: If you want backgrounds to feature prominently - especially for outdoor or lifestyle styles - shoot at a lower angle (closer to straight-on). This captures more of the space behind your dish, giving the AI more room to generate scenic environments like patios, gardens, or restaurant interiors.
Food Photo Editing Tips That Work
Basic editing can improve your input photos before transformation. Here's what actually helps:
White Balance Correction
If your photo has an obvious orange or blue tint, most phone editors have a warmth slider. Move toward blue to correct yellow cast, toward orange to correct blue cast. The goal is not perfect neutrality - slightly warm tones often look more appetizing.[2]
Exposure Adjustment
If your photo is slightly dark, a small exposure boost can help. Keep it moderate - pushing too far introduces noise and artefacts. If the photo is severely underexposed, you are better off reshooting with better light.
What NOT to Do
Over-saturate. Cranking saturation makes food look artificial and cartoonish.[8] If colours look dull, the problem is usually lighting - fix that first.
Heavy filtering. Instagram-style filters rarely improve food photos for menu use. They add mood at the cost of accurate colour representation.
Expect miracles. Traditional editing adjusts what's in your photo: exposure, colour, contrast. It cannot fix blur, cannot remove the cluttered kitchen behind your dish, and cannot make a plastic takeout container look like fine dining.
That's the problem with traditional editing. You can colour-correct a photo perfectly, but your food is still sitting on whatever surface and background you shot it on.
Why Scene Transformation Beats Traditional Photography
Traditional editing can't fix background problems. The napkin dispenser in the corner. The fluorescent ceiling tiles. The other prep stations visible behind your plated dish.
An AI food photo editor approaches this differently. Instead of editing what's in your photo, it transforms where your food appears to be.
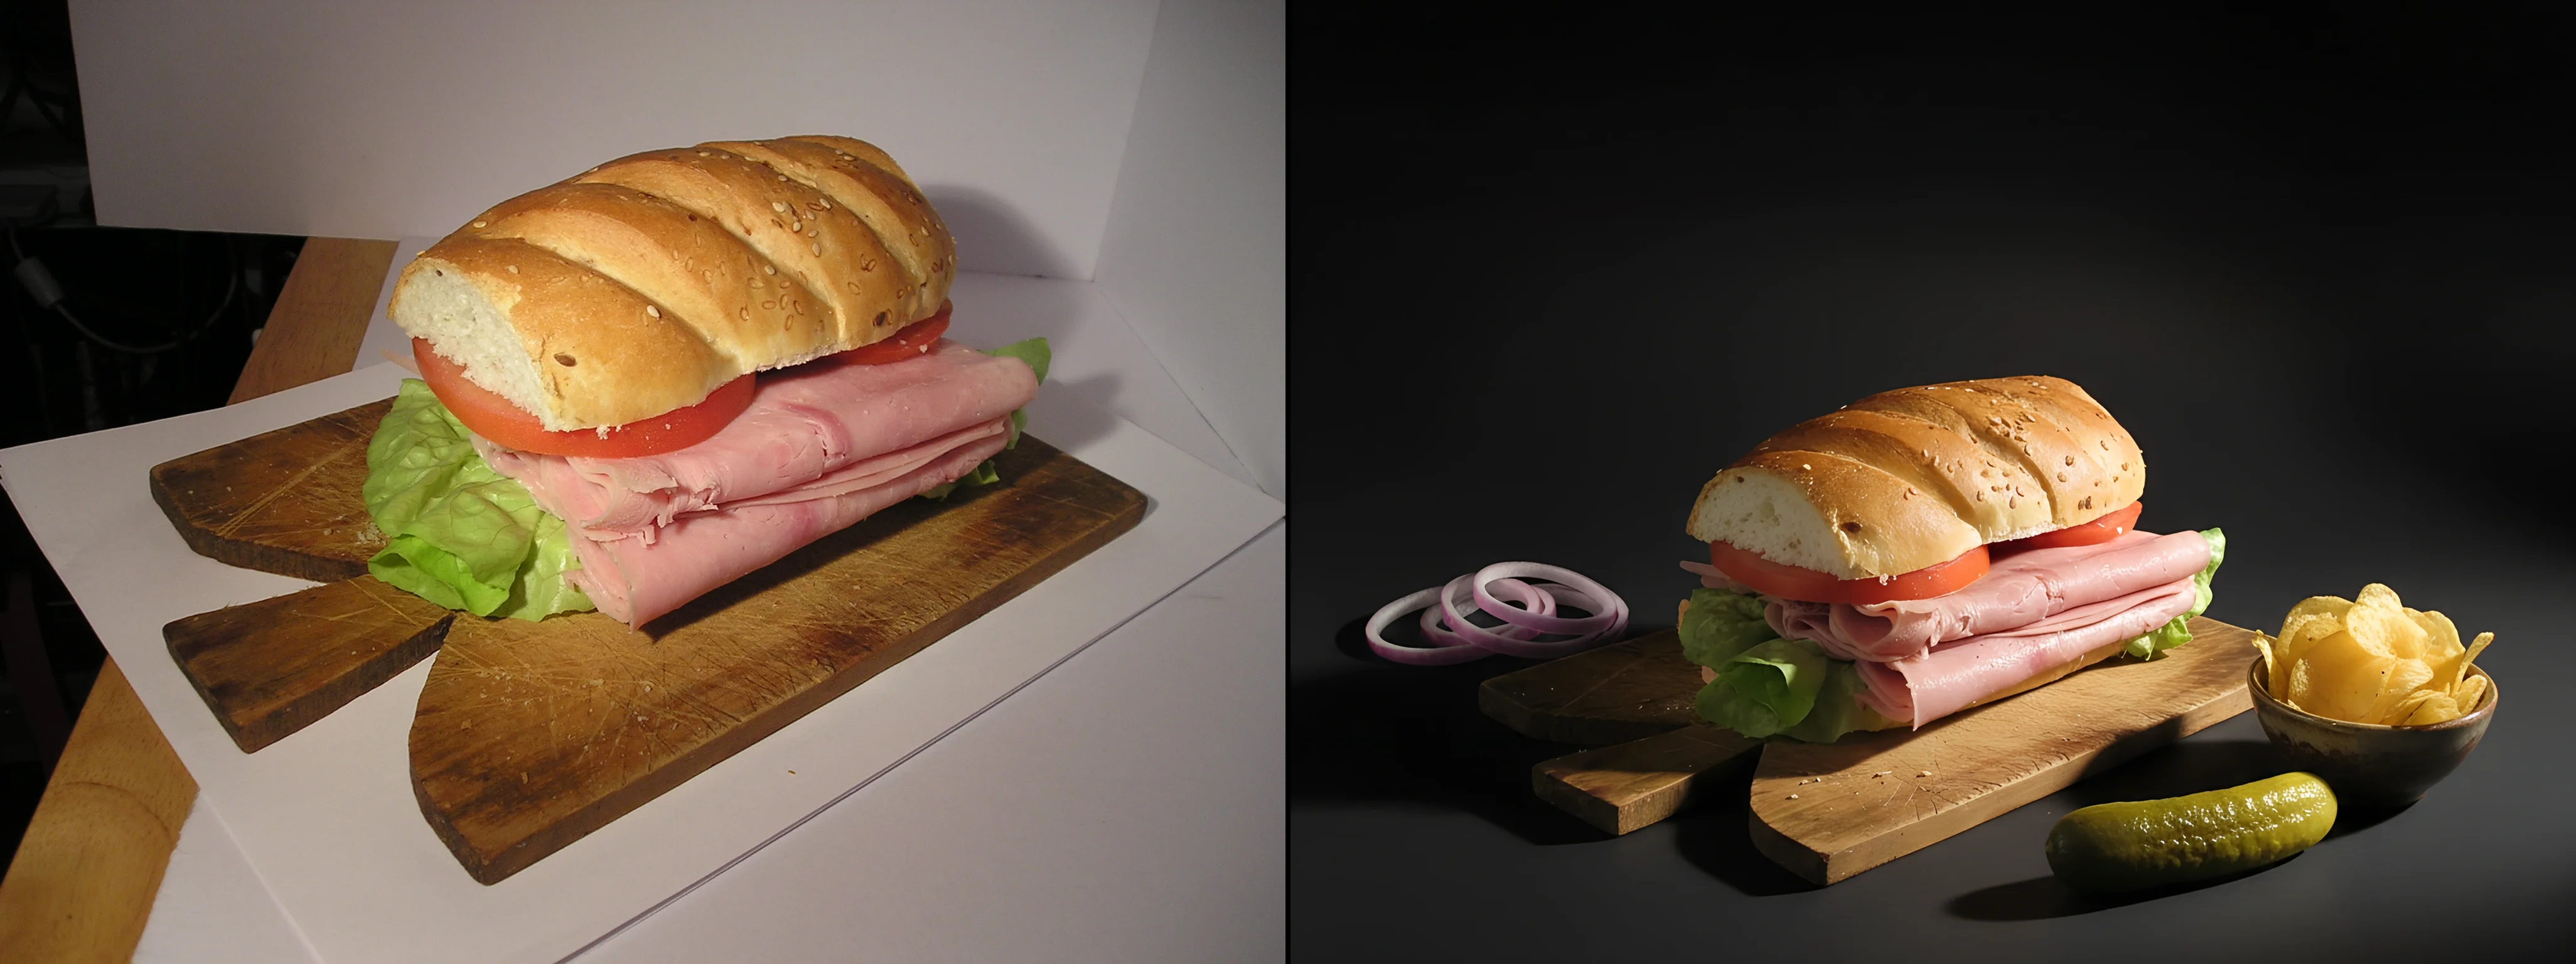 Even challenging lighting conditions can be transformed - but starting with better light gives you more options
How It Works
Upload your phone photo to GourmetPix. Choose a style - Elegant for fine dining, Cozy/Rustic for cafes and bakeries, Urban/Industrial for trendy concepts, Studio for clean app-ready images. See all available styles. GourmetPix keeps your food authentic while generating a professional setting around it.
Not quite right? Refine with simple text prompts. Try a different style. Compare versions. Pick the best.
The Advantages Over Traditional Photoshoots
Unlimited flexibility. A photographer captures 10-15 dishes in one setting over several hours. With AI transformation, you can try five different styles on the same dish and pick what works best.
Iteration. Traditional photography is "you get what you get." AI lets you refine until it's perfect - adjust the mood, try a different surface, change the lighting atmosphere.
Consistency. Process your entire menu with the same style treatment. Every dish looks like it belongs in the same restaurant, even if you photographed them weeks apart in different conditions.
Speed. Results in minutes, not days. No scheduling, no coordination, no waiting for edited files.
Cost. Professional food photography costs $50-500+ per hour, with per-dish rates ranging $15-180 depending on region. AI transformation costs a fraction per image.
The Honest Limitations
AI scene transformation works with what you give it. A sharp, well-lit photo of beautifully plated food transforms into great results. A blurry snapshot or sloppy plating will still show in the final image.
That's actually the point: you stay in control of what makes your food yours. The AI handles the professional staging that used to require expensive shoots.
Getting Menu-Ready Results
The path from phone photo to menu-ready image:
1. Shoot with intent. Find decent light, keep focus sharp, plate your food with care. Think of the photo as the starting point for a professional image, not a quick documentation shot. Our photo guide covers the essentials.
2. Basic corrections if needed. Fix obvious colour cast or slight underexposure with your phone's editor.
3. Transform the scene. Upload to GourmetPix. Choose your style, refine until you're happy.
4. Export in high resolution. 4K output works for everything from delivery apps to printed menus.
The entire process takes minutes. No photographer scheduling, no studio rental, no waiting days for edited files.
Ready to transform your food photos? See our pricing or try GourmetPix free - 10 credits included, no credit card required.
Frequently Asked Questions
How can I improve food photo lighting without professional equipment?
Natural window light is your best free resource - position dishes near a window with indirect light coming from the side or behind. Avoid direct sunlight (too harsh) and mixed light sources (hard to colour-correct). Morning light is typically softer than afternoon. For artificial light, look for evenly-lit areas away from harsh spotlights.
What are the most important food photo editing tips?
For basic editing: correct obvious colour casts with the warmth/temperature slider, make small exposure adjustments if needed, and avoid over-saturating colours. Keep edits subtle - heavy processing makes food look artificial. For background and scene issues, consider AI scene transformation tools rather than trying to mask or blur distractions manually.
Can I use phone photos for professional menu images?
Yes, but input quality matters. Your phone camera is capable enough - what matters is adequate lighting, sharp focus, and intentional food presentation. A well-lit, focused phone photo transforms into professional results. A dark, blurry snapshot will not improve much regardless of what tools you use afterward. See our photo guide for detailed tips.
Why do my food photos look yellow or orange?
Restaurant lighting typically uses warm tungsten bulbs (2800K-3200K colour temperature) that cameras capture as an orange/yellow cast. Your eyes compensate automatically, but cameras record what's actually there. Fix this with white balance adjustment - slide temperature toward blue to neutralize the warm cast.
What's the difference between photo editing and AI scene transformation?
Traditional editing adjusts properties of your existing photo - exposure, colour, contrast, saturation. The background and setting remain what you shot. AI scene transformation replaces the environment around your food with professional settings while preserving the food itself. One fixes technical issues; the other solves the "my kitchen does not look like a restaurant" problem.
How do professional food photos increase restaurant sales?
Menu items with professional photos see up to 30% higher sales. With the food delivery market now exceeding $288 billion, photos are often the deciding factor on apps where customers cannot experience your restaurant in person. Consistent, professional-looking menu images signal quality and build trust before a customer ever tastes your food.
References
Ready to Transform Your Food Photos?
Join thousands of restaurants and food businesses using AI to create stunning, professional images.
GET STARTED